
By Lew Dobbins, Northern California/Lake Tahoe Chapter
This article is based on my opinion and experience of dealing with marine engines for way too many years!
As we care about protecting our boats, I’m sure that you all made a good job of winterizing your engines and fuel systems. So, let’s take a look at what we need to do to activate our boats and prepare for reliable operation. As a reminder of what we did last fall, here are the items we need to deal with:
1. Batteries: Charge our battery or batteries. You might have kept them on a trickle charger over the winter, either in or out of the boat. A smart charger is most desirable as we do not want to over-charge the batteries. This will monitor the rate and percentage of charge and protect from over-charge. Cleaning the battery cable terminals and the battery posts should be a part of your list. Battery corrosion protecting pads, green for negative and red for positive, do work somewhat. A little bit of water pump grease on the connectors can also prevent corrosion but can be messy.
2. Fuel Systems: You added some sort of fuel preservative to your fuel tank and ran the engine to ensure it reached the carburetor to fully protect it. Remove the gas cap and carefully take a brief smell of the tank. If the fuel smells VERY strong or like varnish, it is time to drain or siphon as much of the fuel from the tank as you can and take to the landfill that accepts hazardous waste. If it still smells like good gas or is just lightly “strong”, proceed with adding fresh fuel. Even with stabilizer in the fuel, we still want to add fresh fuel to the tank to mix with the protected last year’s fuel. Time to turn on the fuel valve or valves before cranking. You know, that pesky valve at the top of the tank under your transom deck and behind a seat back, that hard to get to valve! If you changed your fuel filter last fall, congratulations! If not, it is time to change the filter.
3. Cooling System: Time to close or replace the water drain cocks and plugs on the engine and manifolds. We all have different engines in our boats. Some have closed cooling systems that cool the engine with water and antifreeze. That means that we only needed to drain the fresh water part of the system. This would be the water pump, heat exchanger and possibly sea strainer and maybe oil coolers. But on most of our engines, we physically remove the drain plugs or open the drain cocks from the side(s) of the engine block, exhaust manifold(s) and exhaust risers if so equipped, oil cooler (s) and other vulnerable plumbing. On some of the more modern 6 and 8 cylinder automotive engines, there may be a large diameter hose between the circulating water pump and the thermostat housing. You may have disconnected the lower end to drain it, time to reconnect that and tighten the hose clamps. Some boats do not have enough room to get to some of these areas to close the cocks or reinstall plugs. We may have made the choice to use a bio friendly antifreeze to fill the entire cooling system instead of draining when we winterized last fall. This was done just be- fore shutting the engine down in the fall. In that case, you are good and do not need to worry about the cooling system.
4. Water Pump Lubrication: Your water pump may need maintenance too. Our older marine engines usually have a bronze water pump that may have grease cups, fittings (Zerk fittings) or a packing gland. The Zerk fitting is the easiest to use as we just take a grease gun with Marine or Water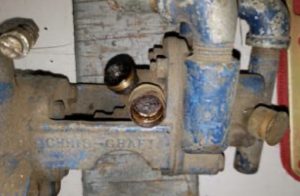
Pump grease in it. A pump or two of the gun and you are good. This can be the same marine grease that you use to lube your bearings on the boat trailer. Older pumps will often have one or two threaded grease cups. These cups hold water pump grease and each season, you need to tighten the cup by screwing it in (clockwise) a half to one turn or until it tightens up while turning. This forces the grease in the cup into passages in the pump that feed the grease to the seals and areas that require lubrication. Every other year it is a good idea to unscrew the cup and 1) Clean and refill the cup. 2) Ensure that the port in the pump is clean and not blocked with hardened grease. Early Chrysler Flat head and Hemi V-8 engines have adjustable packing glands on the two shaft pump. They do the same thing as the afore mentioned cups. These can be tightened a half turn or so with a Chrysler Water Pump spanner tool or by tapping gently with a hammer and flat head punch on the fingers or “Dogs” sticking out of each of the threaded glands. This forces the existing grease into the pair of shaft seals.
5. Engine & Transmission Oil Systems: We always recommend that the engine oil and filter be replaced at the end of a season prior to winter storage. This helps as it removes most of the acid created from combustion that now resides in the oil. You know where I am going with this. If this was not done at the time of winterization, it should be done now. This usually takes a suction pump and a thin hard tube to go down the dip stick tube. Some engines have drain hoses and others have dedicated suction lines. This is best done right after you shut the engine down in the fall as the oil is warm and will flow easily. If you are doing this in the spring, let’s do it after we get the engine fired up and warm the oil.
Speaking of oil, unless you have a modern engine, you want to refill your engine with an oil that HAS zinc in its composition. You can also use a zinc additive such as ZDDP, Lucas zinc additive or others. If you have a Velvet drive or other Hydraulic transmission, ensure that you check the level of the Automatic Transmission Fluid (ATF Dexron III or similar). With engines with older Paragon manual style reverse gears, they share the oil with the engine. Thus, we need to use a single weight oil, usually 30 Wt. Otherwise, the transmission may slip.
6. Engine Internal Issues: How about the inside of the engine? Besides changing the oil, last fall we used a mixture to fog or pickle the engine’s combustion chambers, intake and exhaust manifolds, valves, rings etc. This left a coat of an oil with amazing protective properties to resist and repel moisture and coat all internal parts in its path. That includes the exhaust pipes. This oil protects the internal parts from developing surface rust. When we start the engine, it will smoke heavily, just like it did when it shut down last fall. But this will slowly become less and less. Because
 everything is heavily coated with this oil, you may wish to pull the spark plugs to inspect and clean them. This will also show you if there are any deposits, other than the fogging oil. This is a good time to replace the plugs if dirty or fouled other than the fogging oil. A little bit of solvent, gas or starting fluid will clean the oil off of the plugs. Don’t forget to re-check the spark plug electrode gap or clearance.
7. Almost Done: Time to fire her up and finish fumigating the driveway of mosquitos! Remove that beer can wrapped in a rag that you placed in the exhaust pipe to keep the rodents, insects and small children out of. Do a complete visual inspection of the engine compartment. This makes us look better as we caught things that were still disconnected before we fire her up. Check the fan belts for condition. Remember on a boat with a Chris Craft flat head engine, there is a fan belt behind the flywheel that drives the generator. You may have to remove a seat back to see it. With all of the checks and preparation done, let’s get to it!
i. Set the boat up to run on the trailer with a reliable water supply feeding the engine.
ii. NEVER run the engine without water being applied to the suction side of water pump.
iii. If using a “Fake-a-Lake”, ensure that it is sealed fairly well to the boat water pick up.
iv. Do not use too much water pressure until the engine is running. You can damage the water pump.
v. Prime the hoses between the boat and a bucket and put the garden hose in the bucket. This allows the boat to draw water instead of being force fed. This can also be an indication of the suction pump condition. I also modify all of my boat intake plumbing by adding a valve and garden hose quick disconnect to make it easy to connect a water source for running on a trailer. Faster and easier than using a Fake-a-Lake.
vi. Start the engine in Neutral on the trailer. If you have a Paragon or similar non-hydraulic transmission/reverse gear, place a wood block between the prop and bottom of the boat for safety to prevent the prop from turning. This will protect the shaft cutlass bearing from running dry and destroying itself. This is also a safety issue. viii. Let the engine idle or run at fast idle. Check to ensure that you have oil pressure showing on the gauge, and that you are charging the battery. ix. Ensure that you are getting water out of the exhaust pipe or pipes. That flow should start in less than 30 seconds, as soon as the engine fills with water. If no flow, shut the engine down and recheck your water connections. Your Fake-a- Lake may have fallen off.
x. Inspect the engine looking for and smelling for fuel leaks or water & oil leaks, anything out of the normal.
xi. Shut her down, and reinspect for leaks etc. and check your oil levels after a few minutes with the engine off.
8. Drain Plugs: Ensure that your hull drain plug is installed and that you have serviced your trailer bearings and checked the tire pressure of the trailer tires and the spare.
9. And finally put boat in water, play hard, eat ice cream, repeat!
Great article. A special thanks for the idea of wrapping a can with a rag for the exhaust pipe in the fall and blocking the prop when firing it up on the trailer. Think spring!
My Hercules engine rebuilder recommended “wet clutch” (motorcycle) oil. The engines share the oil with the transmission.