
By Reuben Smith, Adirondack Chapter and owner of Reuben Smith’s Tumblehome Boatshop
In traditional boatbuilding and restoration, perhaps no other tools are as critical and as often used as edge tools. We find these to be the most accurate tools in the shop. In some boats, the seams are made tight with wood-to-wood fits, and a few thousandths of an inch can be the difference between a boat leaking or staying tight. For this we use our planes, chisels, scrapers—hand tools that are the perfect combination of form following function.
They can be works of art, with beautifully crafted hardened steel and wooden handles smooth with age. They can be complex devices, with knobs, nuts, frogs, levers, and irons. Or they can be simple, such as just a shaped piece of high carbon steel. When they’re right, they are a joy to use.
Here’s how I work with edge tools and what I think are most important in the shop.
Hand Planes

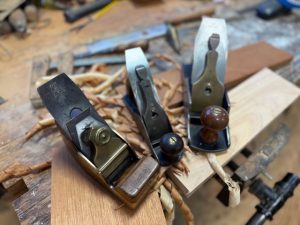
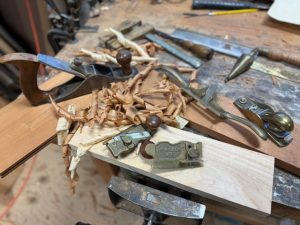
Block planes, left to right: Rabbet plane, bullnose rabbet plane, low angle block plane.
If you can only have one plane, let it be a low-angle block plane. It will be your best friend in the boatshop, so spend a little money and get a good one. The higher the quality of a plane the more flexible it is—meaning that it will perform well doing jobs other than what it was specifically designed to do. Perhaps your next purchase ought to be a No. 5 jack plane. You will need a rabbet plane if your boat has a rabbeted stem and keel, but check your plans carefully, as you might be able to save your money there.
Smoothing planes, left to right: Infill plane, number 2 smooth plane, number 4 1/2 smooth plane.
Next time you feel like spending money, though, get a spokeshave and a smoothing plane, No. 3 or No. 4. If you are a tool fetishist, be happy, as there is a whole lot more out there to spend your money on. But if you’d rather finish your boat and go sailing, you will be able to get by doing most anything with just the planes I mention above.
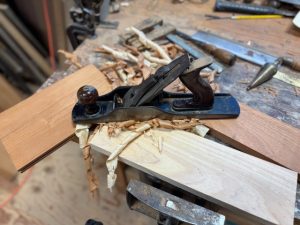
The difference between a block plane and a bench plane is the orientation of the iron, or blade. The bevel on the iron of a block plane faces up; the bench plane’s faces down. This affects the angle of attack of the edge, as well as the edge’s tendency to chatter. The block plane is meant for working end grain, something we do often in boatbuilding. The bench plane is for working face grain. However, if you have a good understanding of your tools, and can sharpen and tune them well, they’re more flexible than that, and a block plane can do very well on face grain.
A plane is only accurate when you’re not asking too much of it. The biggest mistake I see people making with their planes is setting them for too deep a cut. Let that iron barely poke through the sole, such that it takes translucent shavings, and the plane is a terrifically accurate, easy-to-use tool. If you have a lot of wood to plane off, go ahead and set for an aggressive cut, but always finish with the blade backed well off. In a wood like mahogany, set the throat tightly, and you’ll avoid tearing out the grain.
Number 5 jack plane.
Also, let the plane work for you. Get a good working stance and have the piece you’re working on well clamped down so you can bear hard on the tool. Always start your stroke with the blade just off the edge of the board, with your hand on the front of the plane holding the forward part flat on the wood. Then drive the plane through the cut as steadily as you can, looking for a nice, even shaving the whole way through. When you pass the plane off the far end of the board at the end of your cut, bear down on the back of the plane, keeping that section flat on the wood.
Chisels and Slicks
Slick.
We have full sets of chisels in the boatshop, but the ones I use by far the most are the ones with the two-inch blades. These are meant to be worked with the bevel up, like a slick, and have a little bit of crank to the handle.
I use these chisels for hogging off lots of wood, and for making careful cuts on end grain. This is a personal preference of mine; I know many boatbuilders who don’t rely on this tool like I do. These tools only work well if kept very sharp.
Cabinet Scrapers
A set of cabinet scrapers is also very useful in the shop. You can grind them to any shape you need, and are easy to sharpen, once you get the hang of it. They’re very useful in scraping epoxy, or in removing old finishes. If you get very good at sharpening, you can use them to shape carved surfaces, and can even use it in lieu of sanding.
Keeping it Sharp
Planes for curved surfaces, left to right: spokeshave, compass plane.
Everything in boatbuilding follows easily from sharp tools. Sharpening is arguably one of the most important skills in the boatshop. The system I showed in the ACBS workshop is only one of many systems for sharpening irons and chisels, but it’s the one that works best for me. This one gives the blade three bevels.
Step 1: The first step is to lap the back of the iron very quickly, just
to clean off any burrs that might be back there. Also, always work off any machining marks on the back at the edge. Keep the back of the iron flat, and it will chatter less in your plane when you’re working it hard.
Step 2: Now, grind your primary bevel. Do this with a slow-turning, aluminum-oxide wheel, or even a belt sander. Just be careful not to overheat and distemper the blade. If you use a belt sander that you also use for wood, watch out that the sparks from grinding don’t start a smoldering fire that doesn’t flare up until three in the morning when you and all the firemen are in bed. With this bevel, you are only trying to take off some metal so that you don’t have so much to grind with the waterstones, which are slow cutting. Don’t actually grind to the edge with a fast-cutting grinder or sander, as you’ll certainly burn the steel.
Step 3: Next, set the blade in your honing guide, at the bevel you want. I use 35 degrees; most people like them shallower, but I don’t feel the shallow bevels hold up well enough in the woods I use. At this point, you’re working the secondary bevel, steeper slightly than the primary. Work the edge back until you’re into nice new metal, not nicked or dulled in any way. This usually takes me one minute or so on the 800- grit waterstone.
Specialty planes. Clockwise from top left: Scrub plane, router plane, apron plane, side rabbet plane set.
Step 4: Finally, grind the microbevel. Set your guide to a slightly steeper bevel, and put the iron to the 4000 to 6000-grit polishing waterstone. You’re now working the very edge of the blade, and are merely polishing any grinding marks that the 800-grit stone may have left on the cutting edge.
The goal is to have an absolutely smooth, polished cutting edge. In the old days they did this with a leather strop or heavily calloused palm. This takes just a few dozen strokes. Pop the blade out of the honing guide, lap it quickly on the polishing stone, and get back to work.
Tools: the Real Workhorses of the Boatshop
The subject of tools—and how to sharpen them—can fill a book. And in fact, it has filled many. Without proper and good tools, even expert craftsmanship suffers. To a boatbuilder, an edge tool that really works well is worth its weight in gold, worth the expense, and is as wonderful a thing as a good-handling boat.
Reuben Smith (Adirondack Chapter) operates his Tumblehome Boatshop near Lake George (in Warrensburg, New York). Smith grew up in a boatbuilding family and has been working on wooden boats since 1981. Over the course of nearly fifteen years, Smith has also conducted boatbuilding workshops and courses, including at the Massachusetts Institute of Technology. Visit www.tumblehomeboats.com.